The third step to starting an affiliate blog is purchasing web hosting…
Web hosting is a service that provides all the required technologies for storing, publishing, and serving a blog throughout the World Wide Web.
To put it in simpler words, web hosting is what makes a blog appear when someone types its domain address into their browser.
Some of the best web hosting providers out there are:
- WPX Hosting
- SiteGround
- Cloudways
- Bluehost
- WP Engine
- & Kinsta
If you’re venturing into affiliate marketing for the first time, I recommend picking Bluehost as it comes with numerous beginner-oriented perks, such as:
- Extremely affordable plans (starting at just $2.95/month)
- Free domain name
- Free SSL & CDN
- Simple to set up and utilize
- Reliable hosting servers
- 24/7 customer support
- & much more
Right below I’ll be walking you through the step-by-step process of signing up for Bluehost’s hosting services.
Step 1: Getting Started
Head over to Bluehost’s homepage and click on the “Get Started” button.

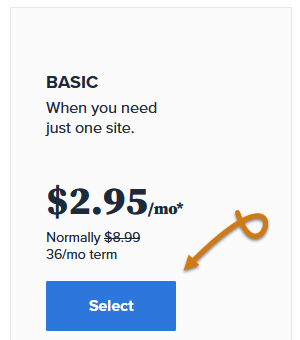
Step 2: Pick Your Hosting Plan
On the next page, you’ll come across all of Bluehost’s available hosting plans…
Since you’re after starting a simple affiliate blog, I suggest going for the basic one.
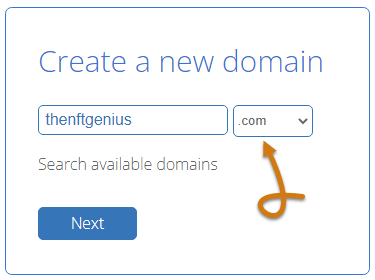
Step 3: Create Your Domain Name
Once you’ve selected your hosting package, you’ll be prompted to create a domain name for your blog…
A domain name is the unique string of text appearing after the “www.” that signifies the digital address used to access a specific website or blog… For example, the domain name of Google is google.com.
Normally, the cost per domain name registration is $10 – $20 but as previously mentioned, every qualifying hosting plan purchased via Bluehost enables you to register a brand new domain name completely for free.

Your blog’s domain name should be 100% identical to its name.
Also, I’d encourage you to avoid weird domain extensions such as “.site”, “.online”, “.biz”, “.club”, “.blog”, etc and stick with the classic “.com” as it’s not only timeless, familiar, and much more memorable but it also it inspires credibility, trustworthiness, and professionalism.
For example, the best domain name for a blog named “The NFT Genius” would be “thenftgenius.com”.
If the .com domain name that corresponds to your blog’s name is unavailable, you could either attempt to rename your blog altogether or utilize hyphens (-).
For instance, the name of my blog is Dear Boss I Quit… However, the domain name “dearbossiquit.com” wasn’t available so I decided to launch it using its hyphenated counterpart “dearboss-iquit.com”.
Just a heads up…
If you decide to hyphenate your domain name try to avoid using more than one hyphen.
That’s because domain names with multiple hyphens are not only more confusing, spammy, unreadable, and easily forgettable, but also harder to share and advertise accurately via verbal means (e.g. word of mouth, radio, podcasts, etc).
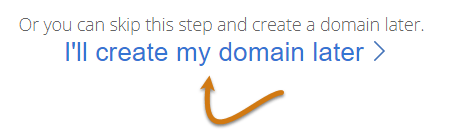
If you haven’t decided upon a domain name yet, you could skip this step by clicking “I’ll create my domain later” at the bottom of the page but I’d advise you not to because then your affiliate blog will be constructed under a temporary domain which is rather complicated to replace with a normal one down the road.
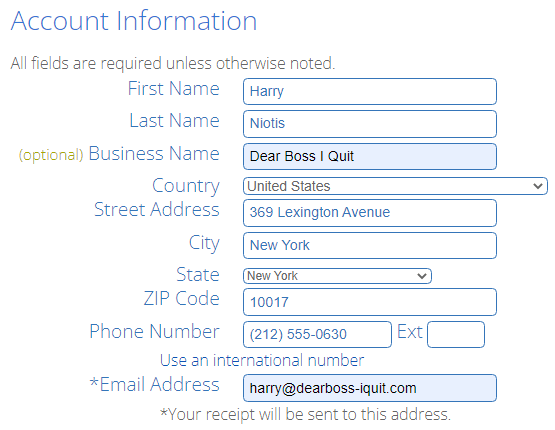
Step 4: Fill in Your Account Info
Step 5: Pick Your Plan’s Duration
The duration of Bluehost’s basic hosting plan defaults to 36 months at $2.95 per month.
Paying hosting upfront for 3 years might seem like a big commitment but since building a lucrative affiliate marketing blog is very unlikely to happen in less than a couple of years it’s what makes the most sense.
Nonetheless, if you’re just after dipping your toes in the water without being quite sure about whether or not you’ll be sticking with affiliate marketing in the long haul, you can always shift to Bluehost’s yearly plan at $4.95 per month.
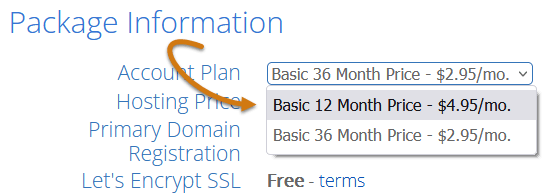
Whatever the case, all of Bluehost’s hosting packages are covered by a 30-day money-back guarantee.
Step 6: Leverage Extra Services
After settling on the duration of your hosting plan, you’ll be presented with a handful of optional extra services that could be leveraged towards expanding the performance, functionality, and security of your affiliate blog.
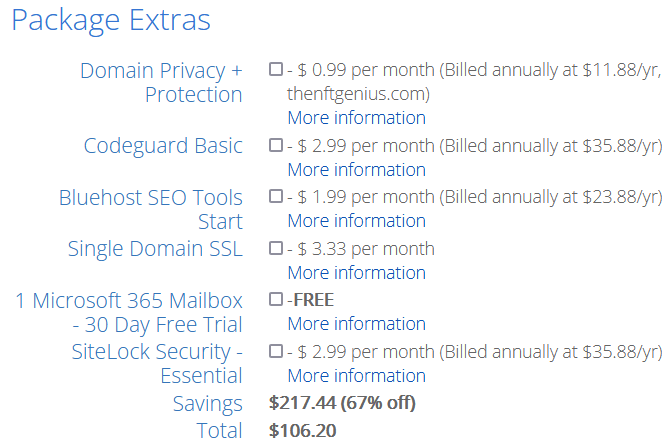
While purchasing any of those extra services isn’t truly necessary, the “Domain Privacy + Protection”, the “Codeguard Basic”, and the “SiteLock Security Essential” could be worth the investment.
To find out exactly what each of those services does, simply hit the “More information” button right below its respective pricing.
Step 7: Submit Your Payment Details
Bluehost accepts payments either via credit card or PayPal.

Just select the payment method of your preference, fill in the corresponding billing details, and hit the “Submit” button at the bottom of the page.
Step 8: Create Your Account
Once the purchase of your hosting plan has been finalized, you’ll be redirected to a page confirming the success of your transaction and prompting you to create your Bluehost account.
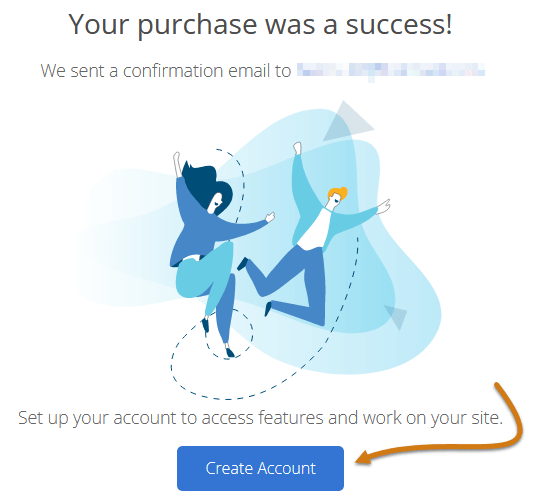
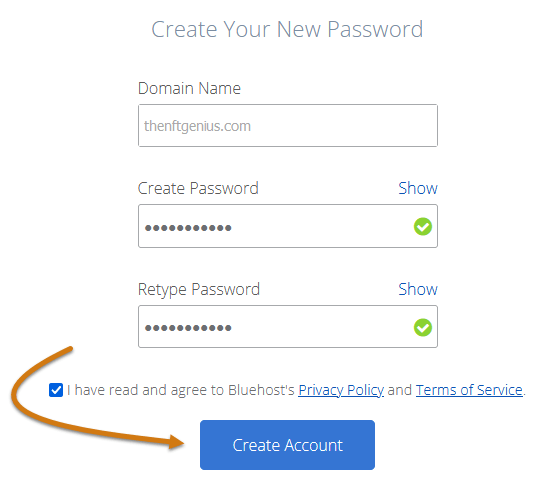
Just click “Create Account”, set your password, agree to Bluehost’s Privacy Policy and Terms of Service, and click “Create Account” once more.
Lastly, log in to your Bluehost account and we’re finally good and ready to start having some real fun by installing, setting up, and launching your affiliate blog!
Building a blog with Bluehost couldn’t be more straightforward…
As soon as you’ve logged in to your Bluehost account, just click on the “Create your website” button to access Bluehost’s intuitive website building portal which will take you by the hand and walk you through the whole process of getting your affiliate blog up and running in no time.

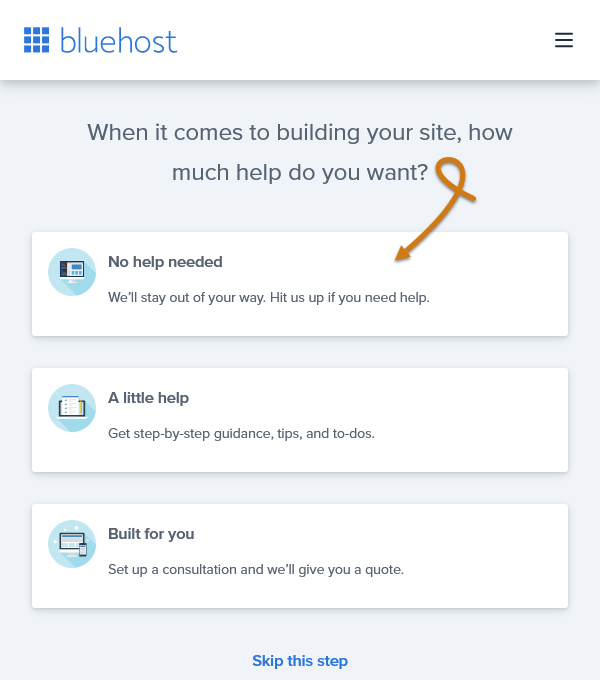
Once you’ve accessed Bluehost’s website building portal, you’ll be asked how much help you want to build your site…
Just select “No help needed” to proceed.
Don’t worry, if you get stuck at any point you can always reach out to Bluehost’s support team for help and clarifications.
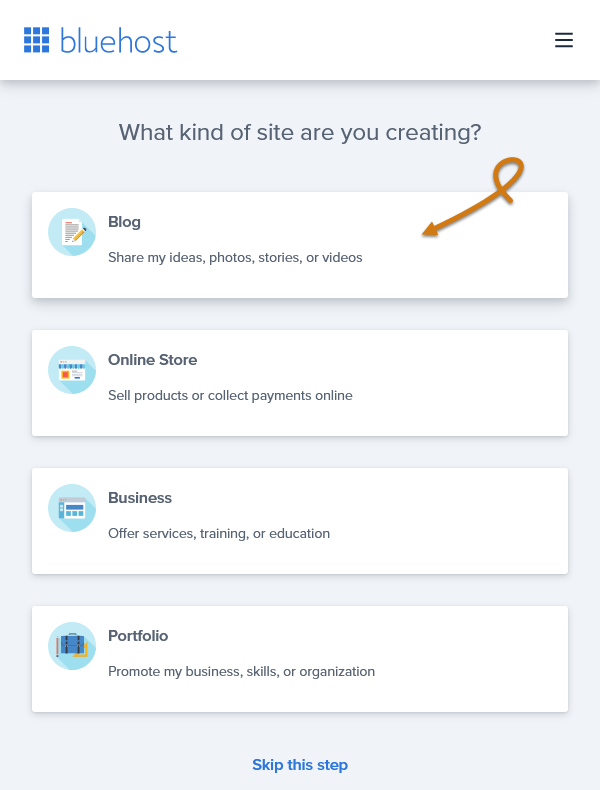
Next, you’ll have to choose the type of website you’d like to create…
Since you’re after starting an affiliate blog, choose “Blog”.
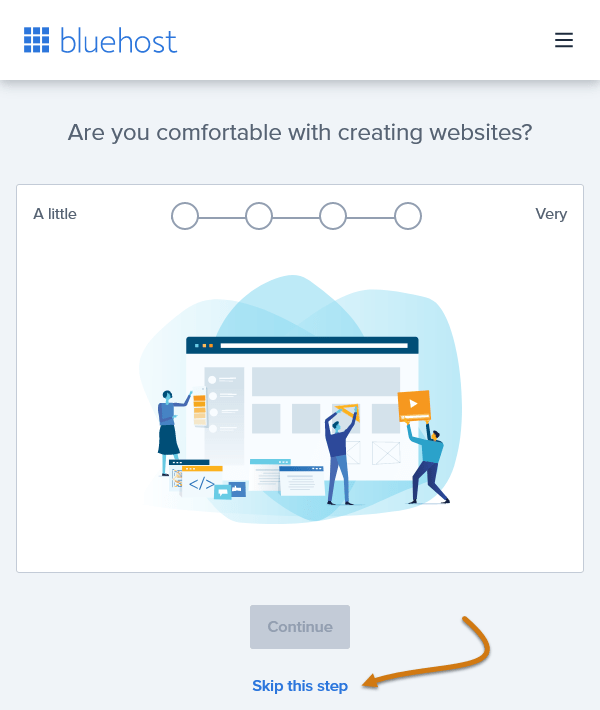
After that, you’ll be prompted to rate your level of comfort with creating websites…
Just click “Skip this step” at the bottom of the page.
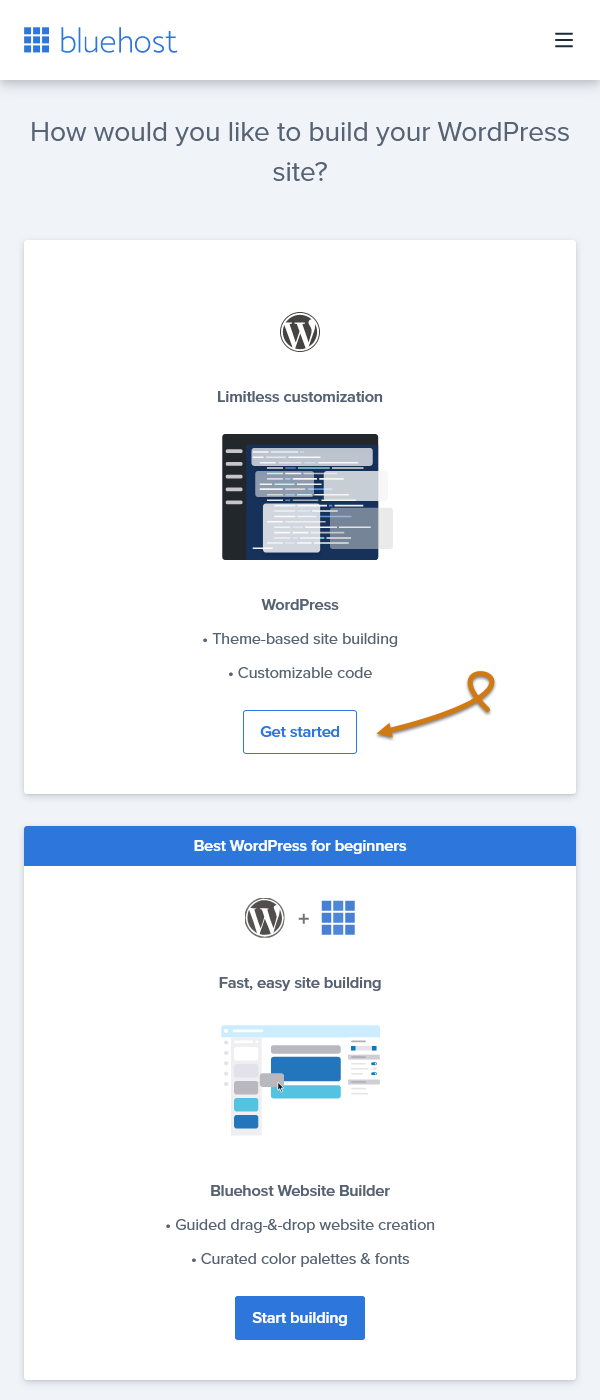
Then, you’ll be redirected to a page where you’ll need to pick whether you want your affiliate blog to be built using plain WordPress or Bluehost’s website builder.
If you’ve never built a website before, I strongly recommend that you go for plain WordPress because Bluehost’s website builder is not only more limited in terms of customization but also much harder and more complicated to utilize.
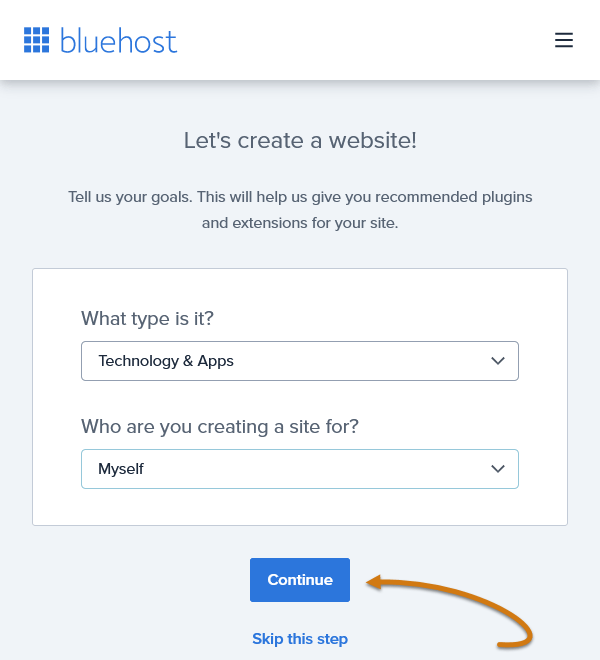
Next, select the main industry of your blog and who you’re creating it for, and click “Continue”.
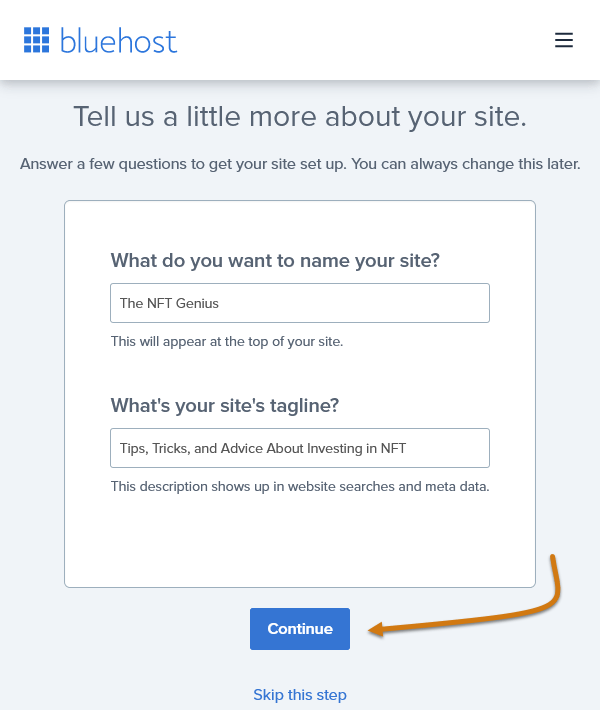
Lastly, fill in your affiliate blog’s name and tagline, hit “Continue” once more, and that’s it…
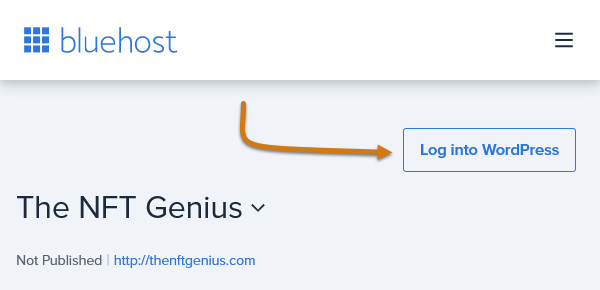
Your affiliate blog is now up and running!
On the next page, click “Log into WordPress” to access your WordPress back office so that you can start setting your affiliate blog up for launch!
The first step to setting up your blog is installing an appearance theme…
An appearance theme is what dictates the overall appearance of your blog such as the design, the layout, the typography, the colors, etc.
Installing a theme for your affiliate blog is pretty simple.
Head over to Appearance -> Themes on the left-hand side of your WordPress dashboard and then select “Add New Theme”.
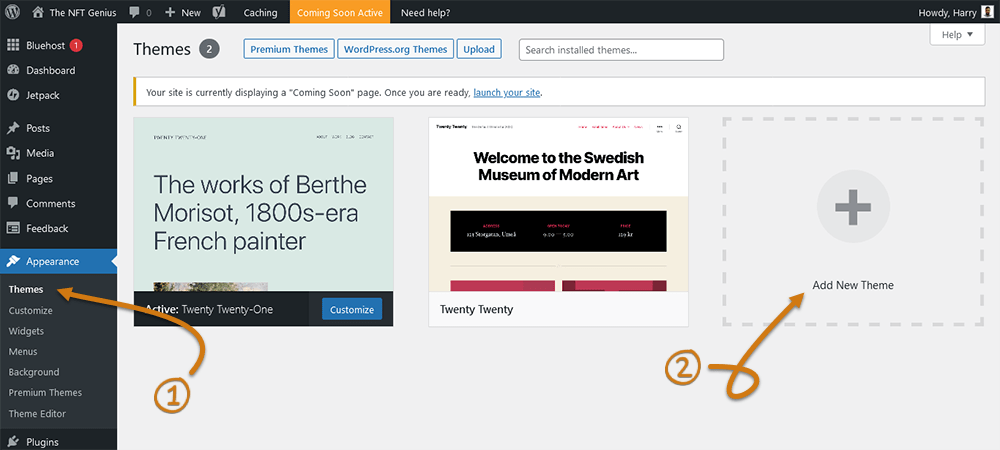
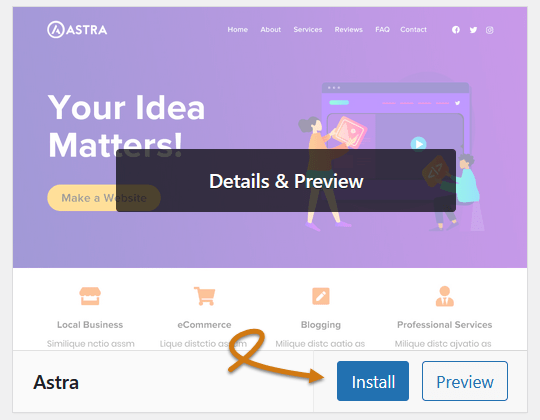
On the next page, start browsing through the available themes (there are over 4000 of all shapes, sizes, and layouts) and once you come across the one that matches your taste the most, install it by hovering over its card and clicking the “Install” button.
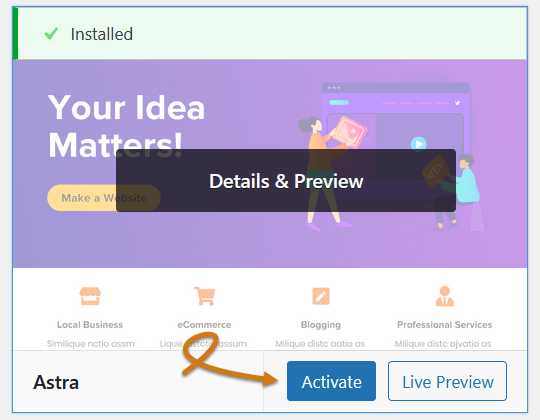
Once the theme gets installed, go ahead and activate it by hitting “Activate”.
It’s highly suggested that you go for a theme that’s minimal, simple to navigate, and easy on the eyes… Since you’ll be running an affiliate blog, your theme shouldn’t distract with tons of buttons, weird layouts, confusing navigations, or overly vivid colors but rather emphasize your content.
Some of the most suitable themes for blogging I’ve tried over the years include, but are not limited to:
- Astra
- OceanWP
- GeneratePress
- Divi
- & Phlox
Now that your theme is installed and activated, you can start customizing its appearance by heading over to Appearance -> Customize.
Once you do so, you’ll get redirected to a theme customization panel that’ll look very similar to the screenshot right below:
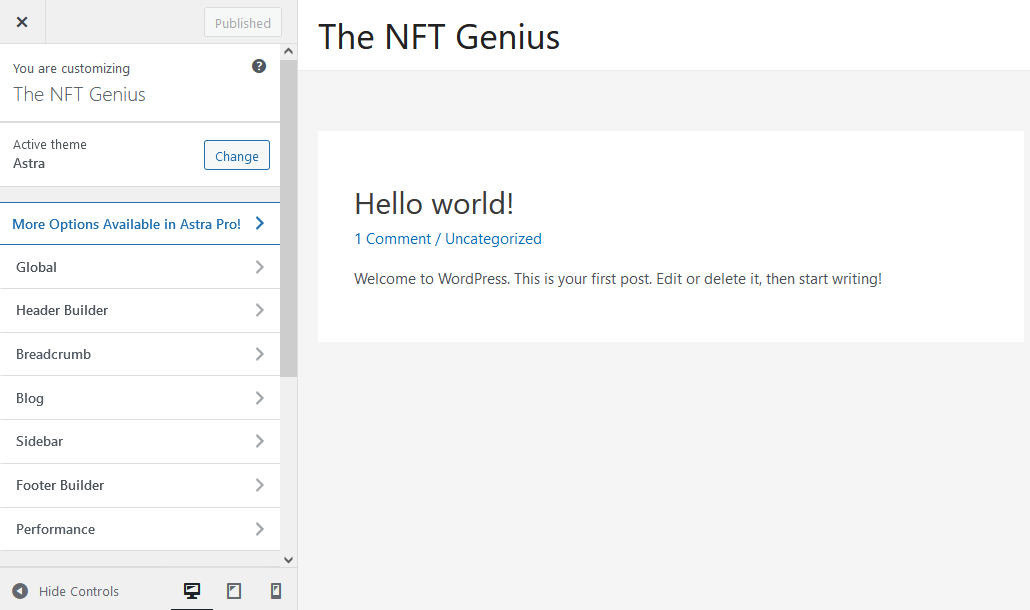
On the left-hand side of the panel lie all the customization options of your chosen theme. On the right, there’s a live preview of your blog’s appearance.
Before you start making any changes, I recommend that you take a quick tour and familiarize yourself with all the available customization settings.
However, don’t feel obligated to tamper with every single one of them in an attempt to make your blog look perfect from the get-go because you’ll be wasting precious time which could be invested in much more important aspects of growing your affiliate blog, like creating high-quality content.
Customizing just the very basics, such as the typography, color schemes, and menus is more than enough for starters.
Before you begin publishing content, it’s important to get every single aspect of your blog set up the right way by making some minor adjustments to a handful of settings right inside your WordPress dashboard…
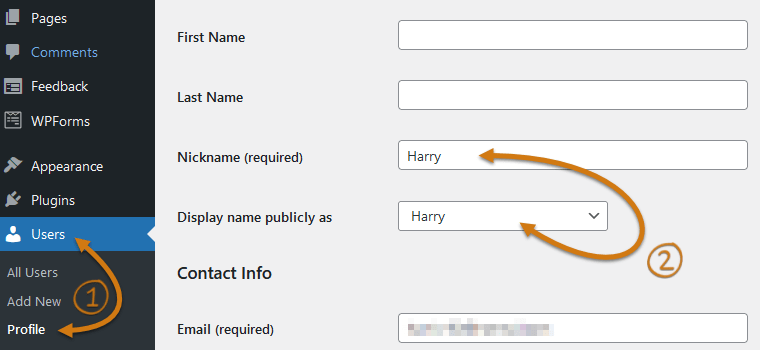
First, go to Users -> Profile…
Then scroll down, change the Nickname and the Publicly Displayed Name to your own name, and hit “Update Profile” at the bottom of the page.
Secondly, head over to Settings -> General, fill in your site’s title, tagline, URLs, site language, timezone, and date & time formats, and click “Save Changes” at the bottom of the page.
Afterward, click on Settings -> Reading and set your homepage to display the excerpts of your latest posts. Don’t forget to save your changes.
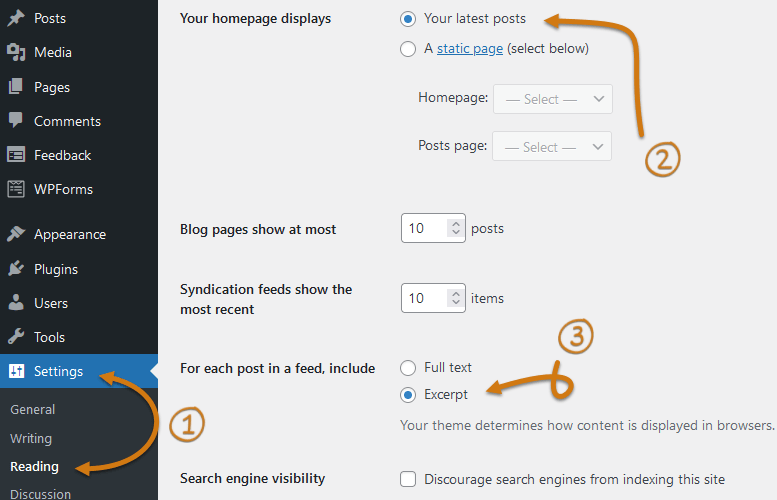
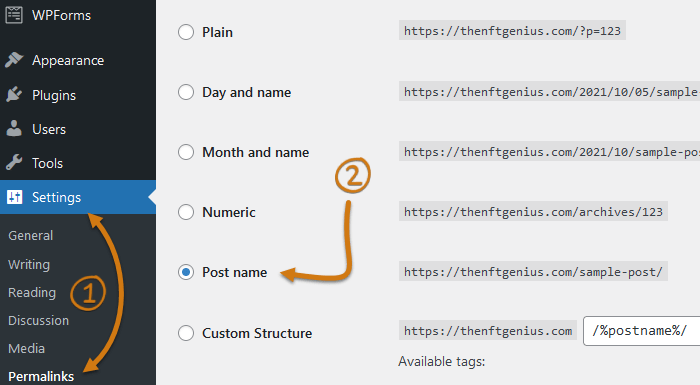
Lastly, head over to Settings -> Permalinks, change your URL structure to “Post Name”, and save.
The next step to preparing your affiliate blog for launch is installing a few WordPress plugins…
WordPress plugins are small third-party software apps that augment the functionality of WordPress-based sites.
The 3 WP plugins that every blog needs to have up and running right off the bat are:
- Classic Editor
- Yoast SEO
- & Google Analytics for WordPress by MonsterInsights
To do that, head over to Plugins -> Add New on the left-hand side of your WordPress dashboard…
Then, type the name of the plugin you’d like to install in the search field at the top right of your screen and hit its respective “Install Now” button.
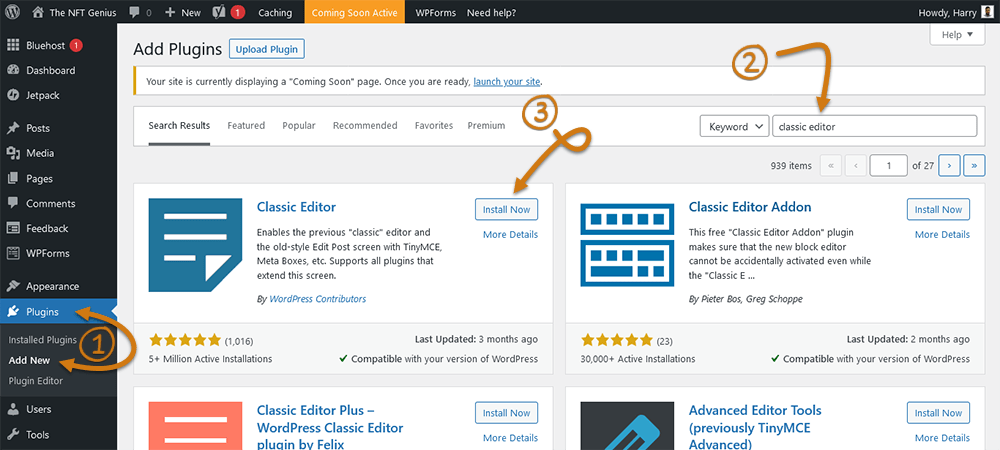
Once the plugin is installed, activate it by clicking “Activate”.

Usually, Yoast SEO and Google Analytics get installed by default on all Bluehost-built websites. Nevertheless, you can check out all the plugins that are installed on your blog by clicking on Plugins -> Installed Plugins.
Some other WordPress plugins that I suggest you consider installing and learning to utilize as soon as possible are:
- ThirstyAffiliates: Manages and cloaks affiliate links.
- Elementor: Drag and drop page builder.
- Shareaholic: Beautiful social sharing buttons.
- Subscribe to Comments Reloaded: Enables commenters to sign up for e-mail notifications when someone replies to their comment.
- Starter Templates: A library of 300+ done-for-you templates for all kinds of pages that can be imported in seconds.
The last step before launching your affiliate blog is activating its SSL.
SSL (Secure Socket Layer) is an encryption-based Internet security protocol that ensures data privacy and information security between your blog and its visitors.
Nowadays, search engines mark sites with no active SSL as unsafe to give users a heads up about potential data loss and compromisation, and browsers may even prohibit access to them altogether.
In short, having no valid SSL could have a very negative impact on the trajectory of your affiliate blog.
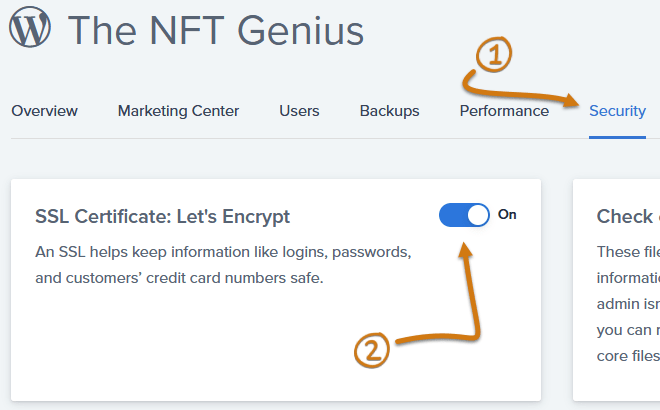
Thankfully, as mentioned earlier, all of Bluehost’s hosting plans come with a free SSL which can be activated without any hassle by navigating over to My Sites -> Manage Site inside your Bluehost portal.
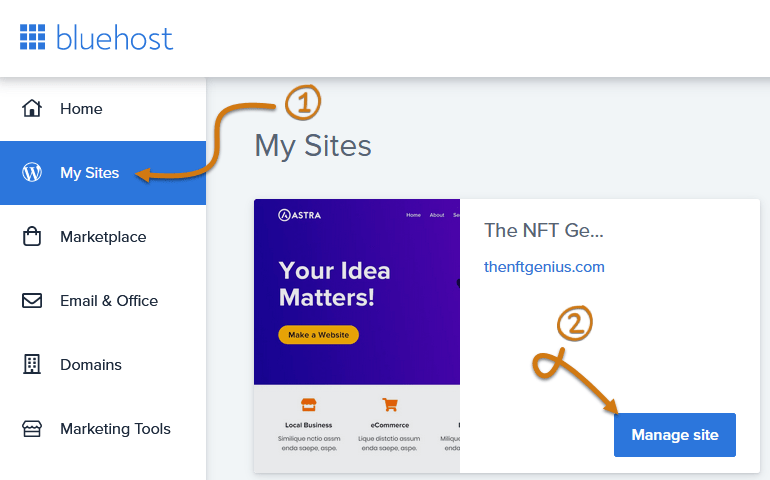
Then click on the “Security” tab and simply toggle the “SSL Certificate: Let’s Encrypt” on.
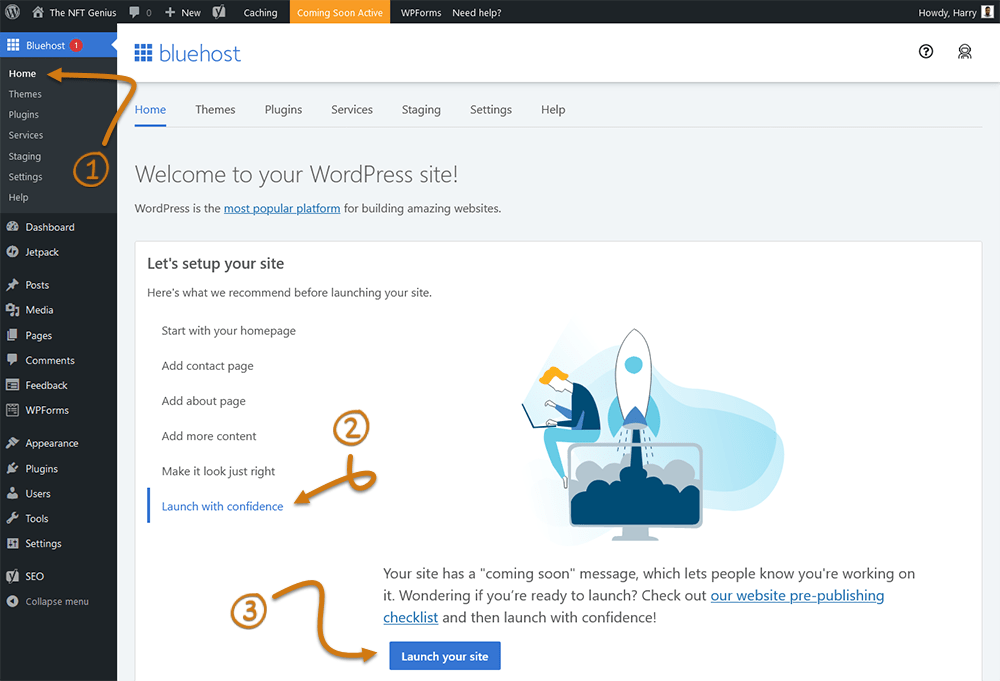
Now that everything’s in place, the time to launch your affiliate blog has finally arrived!
To accomplish that, all you need to do is jump to your WordPress dashboard, go to Bluehost -> Home, select the “Launch with confidence” tab and then click on the “Launch your site” button.
Congratulations, you now own a fully functional, live affiliate blog that’s good and ready to start being monetized!
From this point on, 80% of all the resources you devote to your affiliate endeavors (time, effort, money, etc) should be invested in publishing as much high-value, niche-relevant, helpful blog content as possible, optimally 2-3 times per week.
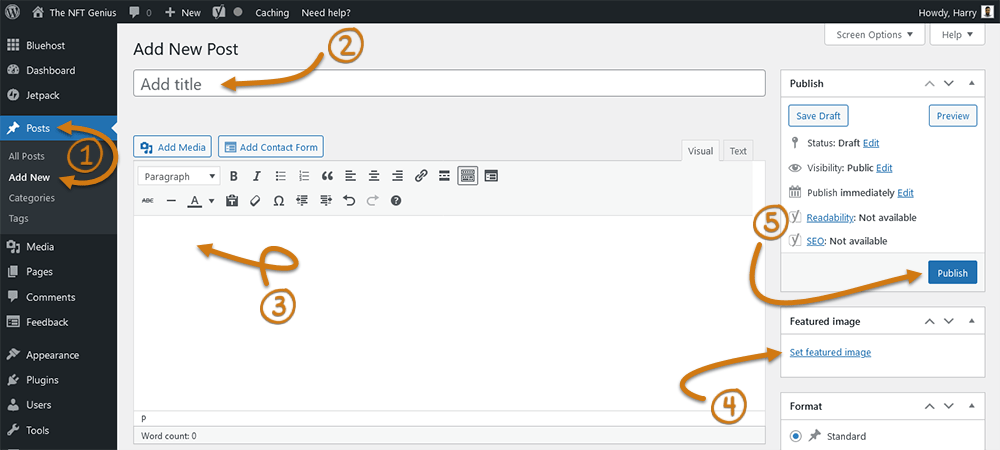
Creating and publishing blog posts using WordPress is extremely straightforward…
- Head over to Posts -> Add New
- Fill in your blog post’s title
- Write your blog content
- Set a featured image
- Click “Publish”
Blog content can come in many shapes and sizes, such as:
- Tutorials
- How-to guides
- Product reviews
- Roundups
- Case studies
- Listicles
- & more
For example, if your affiliate blog revolves around yoga, you could put together a tutorial that’ll be outlining the steps to mastering a specific yoga pose.
Likewise, if you run a blog about virtual private networks, you could create a roundup of the best VPN apps you’ve tried.
Right below, you can check out 15 essential tips for boosting the quality and efficiency of your blog posts:
- Target just 1 main keyword per post
- Aim for at least 1000 – 1500 words
- Incorporate visuals (images, videos, etc)
- Use bulleted and numbered lists
- Write short and skimmable sentences
- Avoid making large paragraphs
- Link to external resources
- Conduct in-depth research
- Employ a conversational tone
- Utilize subheadings to separate subjects
- Include a featured image
- Leverage quotes from experts
- Link to other articles you’ve published
- Forget about making affiliate sales
- Focus on providing value and solutions to problems
The remaining 20% of your resources should be allocated to other blog-scaling practices such as Search Engine Optimization (SEO), Social Media Marketing, Email Marketing, Pay-Per-Click Advertising, A/B Testing, Competition Analysis, Link Building, Keyword Research, etc.
If you have zero clue regarding how to utilize any of the aforementioned practices, purchasing a dedicated course that’ll point you in the right direction by laying out a step-by-step structured roadmap to affiliate success is strongly advisable.
That being said, here’s a roundup of The Best Affiliate Marketing Courses that have helped hundreds of aspiring affiliate marketers go from zero to building a sizeable affiliate income online.
Furthermore, you can get your hands on a FREE 20-Lesson Online Course that takes you by the hand and walks you through the process of building, setting up, and launching your first affiliate blog without spending a single dime right here.