At this point of the course you have already created your WordPress website and now that you are logged into it, it’s time to start setting it up.
This is lesson #4 of my affiliate marketing course.
If for some reason you have missed the previous 3 lessons, it is important to start going through them right away before proceeding with this one.
- What is Affiliate Marketing and How It Works. (Lesson #1)
- What is a Niche Marketing Strategy? Finding Your Niche! (Lesson #2)
- Create Your Own Business Website for Free, in Less Than 2 Minutes (Lesson #3)
In this article, we are going to
- Configure the initial settings of your website
- Set up and update the necessary plugins
- Update your WordPress profile information and image
- Get your website ready for search engine indexing(Basic Search Engine Optimization – SEO)
Let’s then get to it.
Initial WordPress Settings
Once you are in your website’s admin dashboard, go ahead and update WordPress to its newest version.
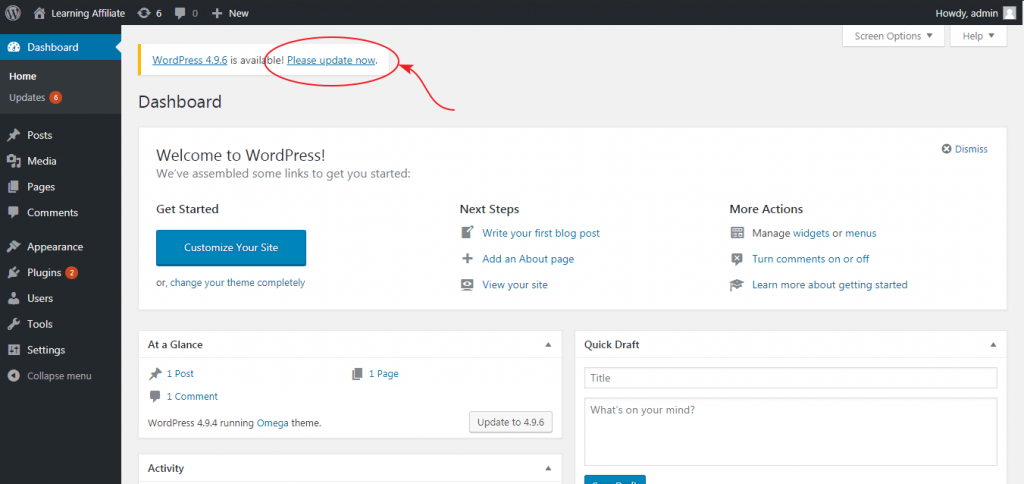
When the update is completed, go ahead and click on the updates icon at the upper left corner of the WordPress toolbar.
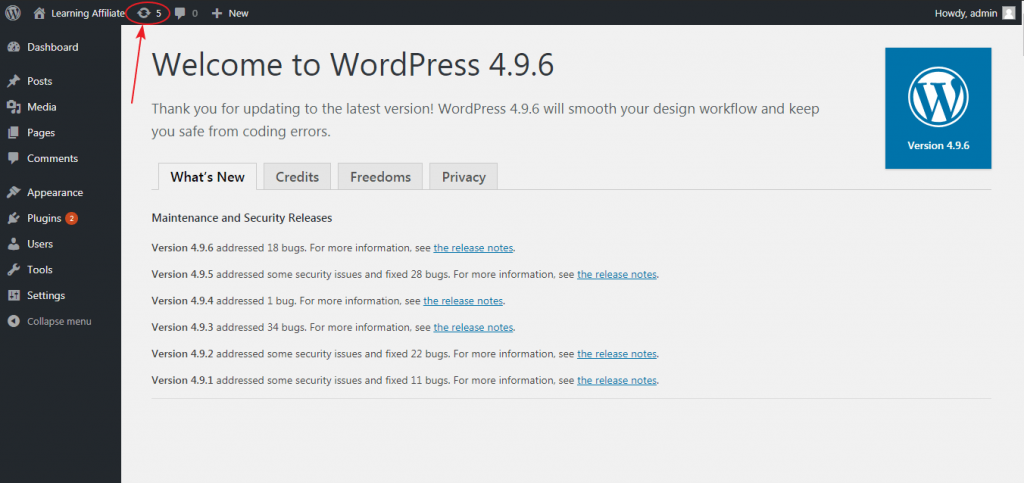
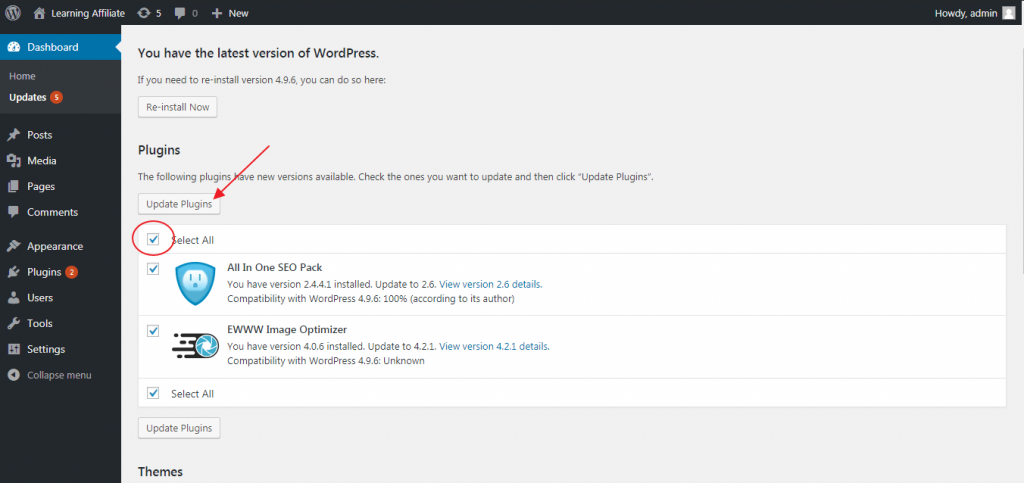
Then, select all the already installed plugins and go ahead and update them.
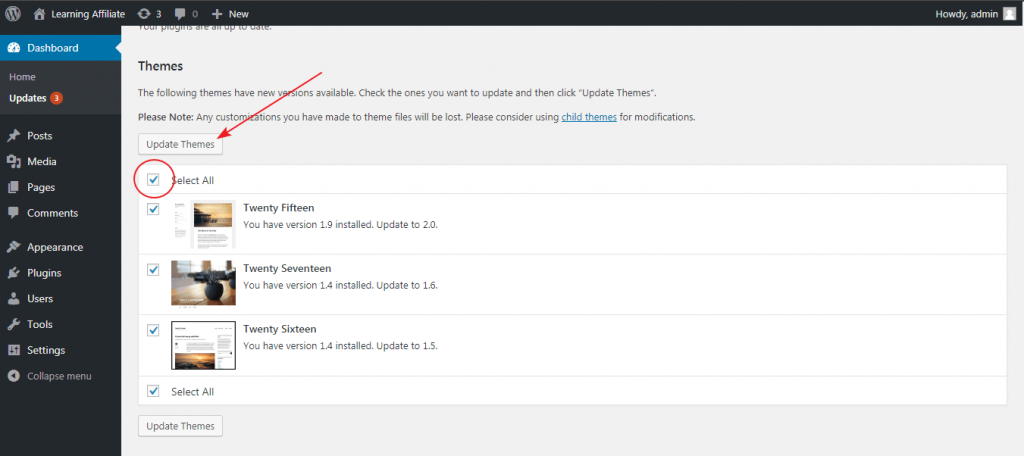
Once the plugins have finished updating, go ahead and click once more the updates icon at the upper left corner of the WordPress toolbar and update all your available themes as well. You don’t really have to update all your themes but only the one that you are currently using if it has any updates available… I just like keeping everything up to date :P.
Okay, now that everything is updated, it’s time to start deleting some sample content that comes with the installation of your WordPress website.
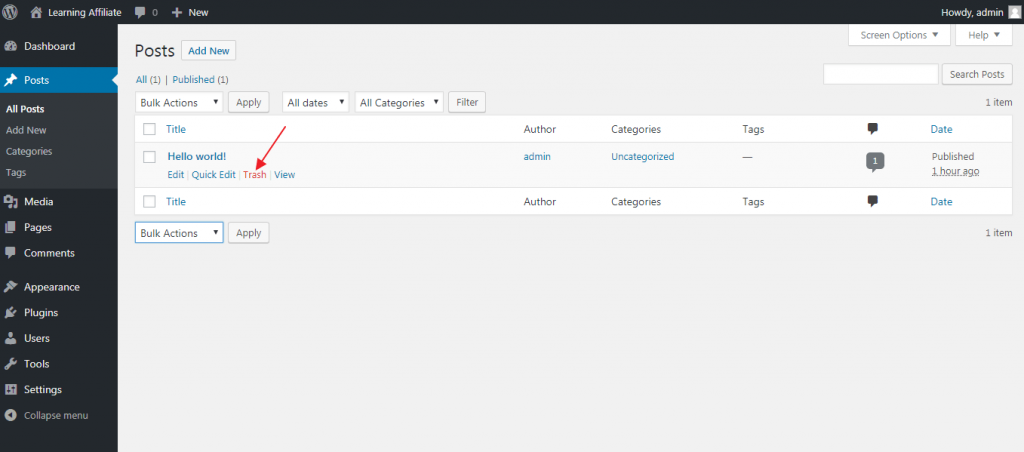
On the left WordPress toolbar, click on “Posts” and then “All Posts”.
There you will most likely find a “Hello World” sample post… Go ahead and “Trash” it.
If there is nothing there, then skip this step.
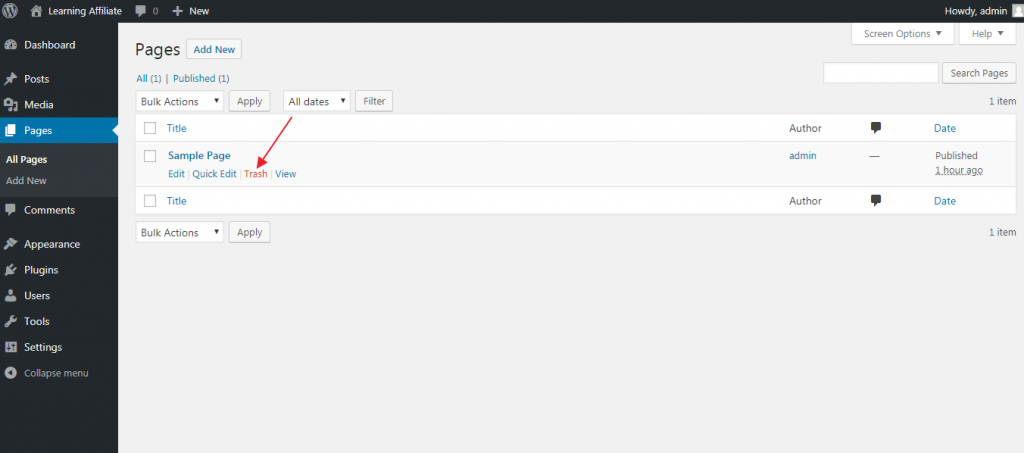
Do the same for the sample pages.
Now that we are done with deleting the sample content, we move on to informing your WordPress profile.
Updating Your WordPress Profile Information
On the left WordPress toolbar, click on “Users” -> “Your Profile”.
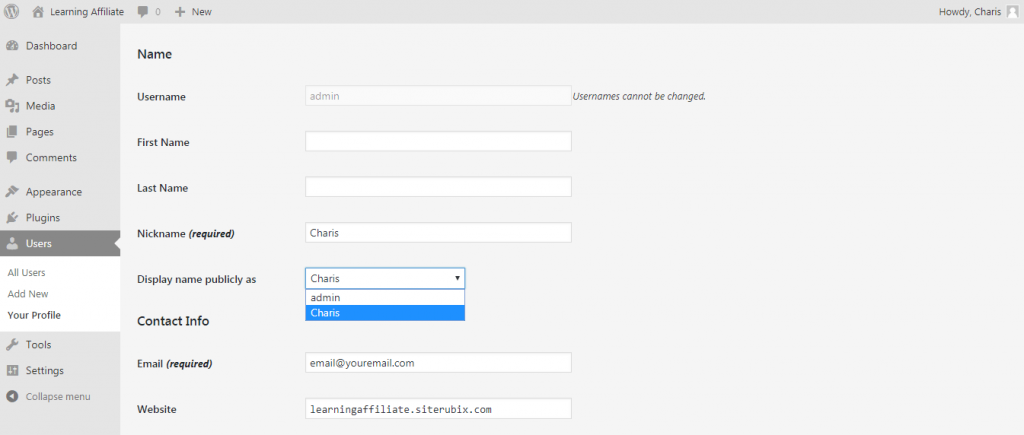
Scroll down and fill in your nickname, email, and website address.
Also, make sure to change the “Display name publicly as” option to your chosen nickname and do not leave it as “admin”.
This way you will be able to build some more trust with your readers as this nickname will be visible all over your website such as the “Author” field, displayed right before or after the content of each of your articles.
Afterward, scroll down a little bit more and fill in your Biographical info.
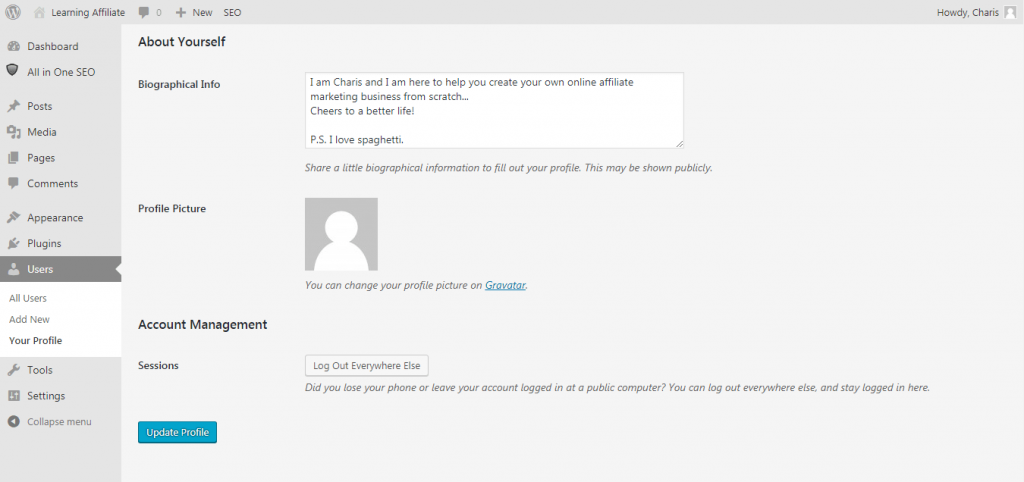
Please be advised that your biographical info might be visible to visitors, depending on the appearance theme that you have chosen for your website and it should include
- your name
- a short description of who you are
- how you are going to help your readers
- something funny and/or impressionable
It usually appears right after the end of your articles and can be toggled on and off.
Adding a profile picture is a good way to gain even more trust so it would be a smart move if you included one.
If you want to do so, you have to create a Gravatar(Globally Recognized Avatar) account and upload the image there.
Make sure that the email you used to create your Gravatar account matches the one which you filled in your WordPress profile earlier or else your image won’t display.
For example, if you used “iamthebest@gmail.com” to create your Gravatar account, make sure to fill in the same email to your WordPress profile as well.
When you are finished, scroll down to the very bottom and hit the “Update Profile” button.
Getting Your Website Ready for the Search Engines
As you already know, when you Google a specific term, a bunch of websites which are relevant to that term show up. Those websites are optimized for the search engines and in order to maximize your visitors you want your website to be optimized and that is what we are going to do right now.
Getting your website ready to be recognized by the search engines is the first step towards a successful SEO (Search Engine Optimization).
On the left WordPress toolbar, click on “Plugins” -> “Installed Plugins”, select them all and go ahead and activate them.
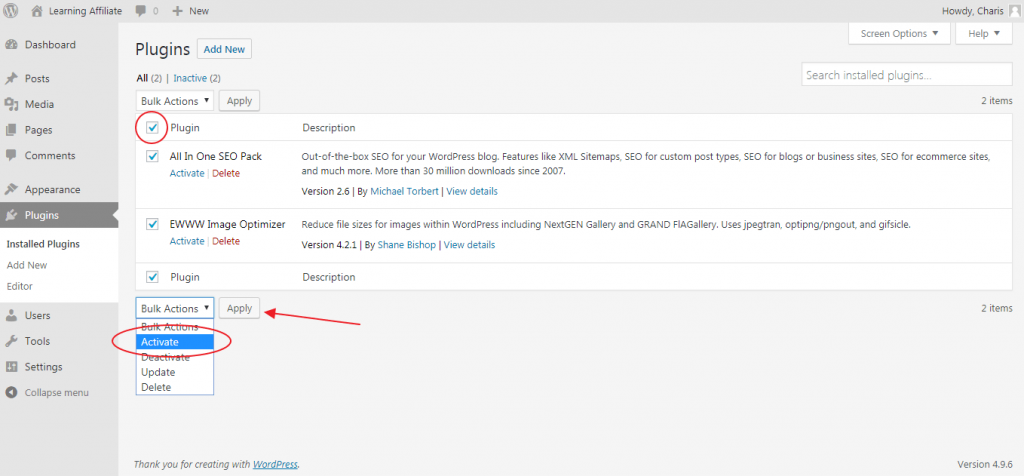
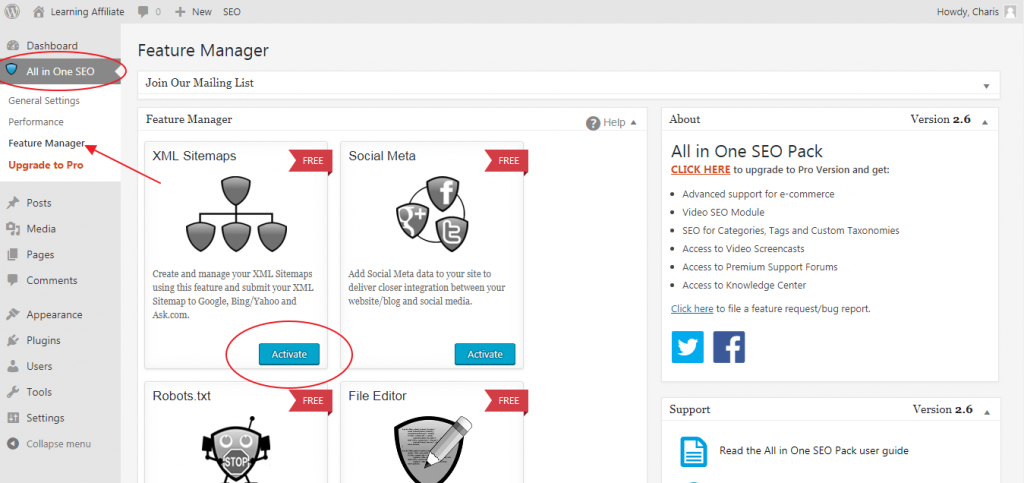
Once you have activated the plugins, an additional option(All in One SEO) will appear on the top of your left toolbar.
Click it, then click on “Feature Manager” and activate your XML Sitemaps.
Setting up Google Search Console for Your Website
With Google search console, you can find out if Google displays your website’s posts and pages, for what queries, at what position, how many people are visiting them, etc.
Moreover, Google search console lets you know if there are errors in your posts and pages so you can fix them and everything gets displayed in the search results.
First of all, go to Google search console.
To get access to the console you need to be logged into your Gmail account.
If you don’t have one, you can create it right here.
Let’s assume that you created your Gmail account and you are logged in Google search console.
All you have to do right now is to add your website (property) to search console.
Write your URL(www.learningaffiliate.siterubix.com) to the appropriate field and hit “Add a Property”.

Google search console will then ask you to verify your website
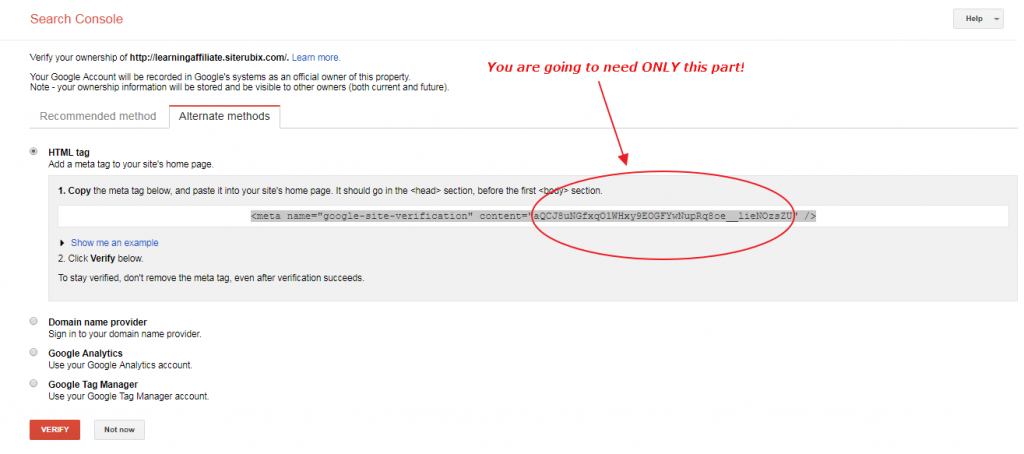
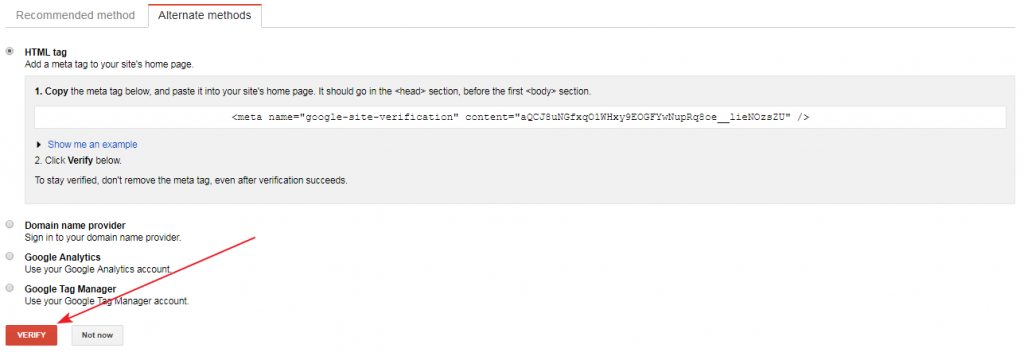
Choose the tab “Alternate Methods”, “HTML tag”, and copy the part of the code as shown in the picture below.
Make sure that you do not navigate away from this page.
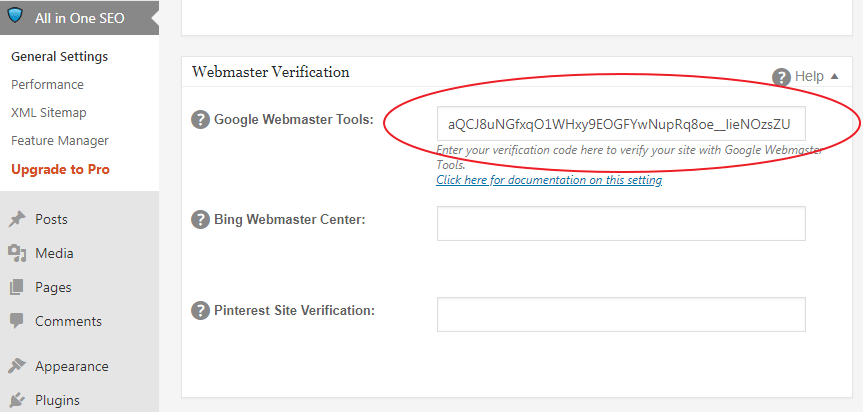
Now go back to your website dashboard, “All in One SEO” -> “General Settings”, scroll down until you find the “Webmaster Verification” area and go ahead and paste the part of the code that you just copied into the “Google Webmaster Tools” field.
Now scroll all the way down and hit “Update Options” to save your changes.

After you save your options, go back to Google search console and hit “Verify”.
Congrats! You verified your website with Google search console!

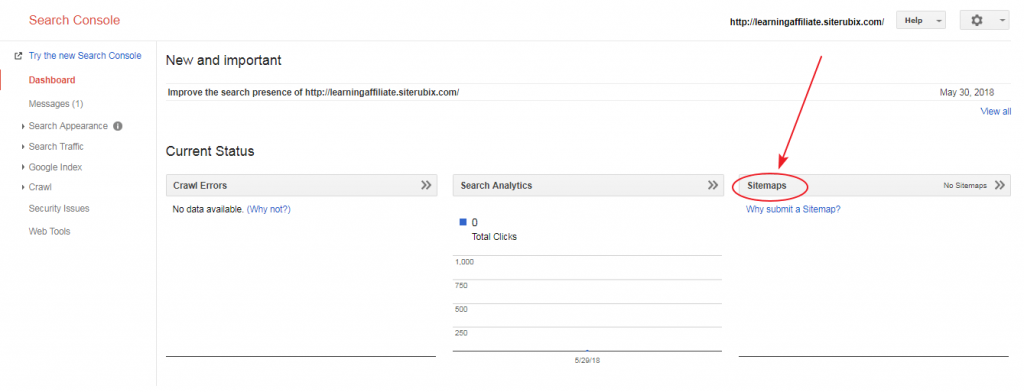
Click “Continue” and then “Sitemaps”.
After that, click on “Add/Test Sitemap”.
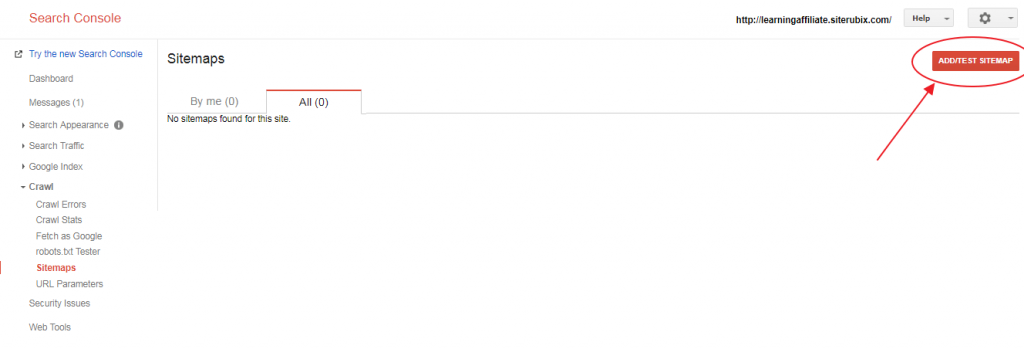
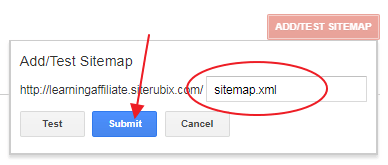
A little box will pop up right below the button.
In the field, go ahead and write “sitemap.xml” and then hit submit.
Google search console optimization is now complete.
However, Google is not the only search console available out there.
There is also Yahoo and Bing which still get around 33% of online search traffic, so letting them discover your site is going to maximize your traffic and in turn your earnings.
Setting up Bing Webmaster Tools for Your Website
Go to Bing Webmaster Tools.
In order to sign in, you need to have a Microsoft account. If you don’t have one, you can create one right here.
You could also log into Bing webmaster tools with the Gmail account you created earlier or even with your Facebook account as well.
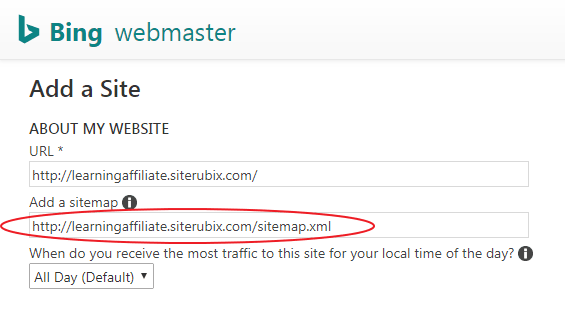
Nevertheless, when you get into Bing webmaster, go ahead and add your website.

Then fill in your sitemap address(https://yourwebsite.siterubix.com/sitemap.xml) as well as all the mandatory information below and when you area ready click “Save” at the bottom of the page.
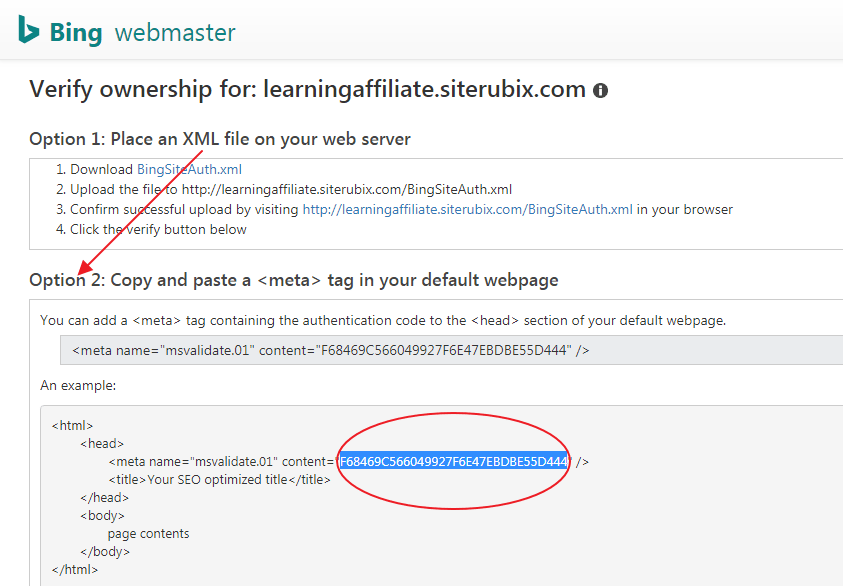
Scroll down until you find “Option 2” and copy the highlighted code as per the image below.
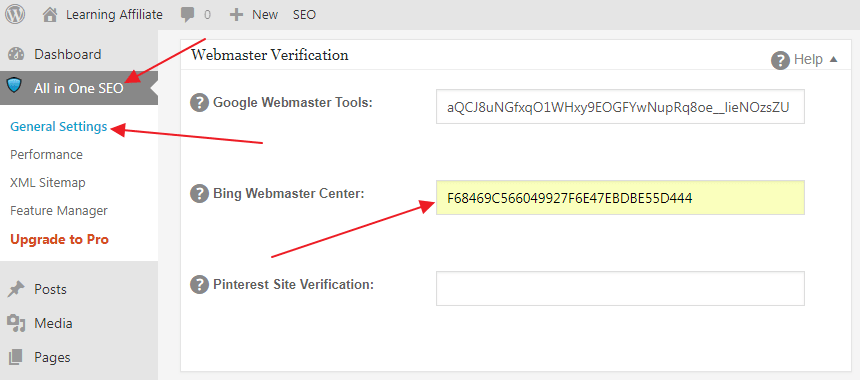
Go to your website’s admin dashboard, “All in One SEO” -> “General Settings”, scroll down until you find the “Webmaster Verification” area and go ahead and paste the part of the code that you just copied into the “Bing Webmaster Center” field.
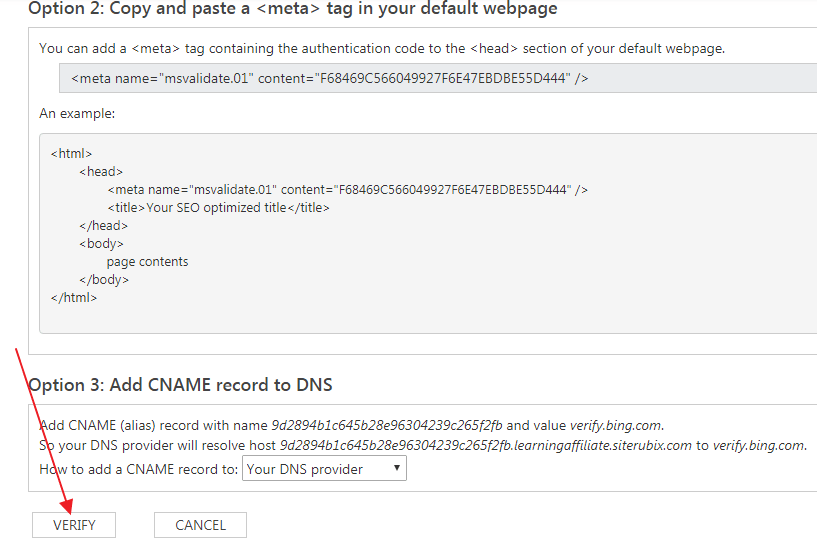
Scroll to the very bottom and save your changes once more.

After your options have been saved, go back to Google search console and hit “Verify”.
Bing webmaster tools have been successfully set up!
Setting up Google Analytics for Your Website
Google analytics is yet another very useful website traffic monitoring tool as it analyzes
- how many visitors your website get per day
- for how long they stay on your pages and posts
- how they navigate your website
- from where they came from(social media, search engine, etc)
- if they have visited your website before
- and much more.
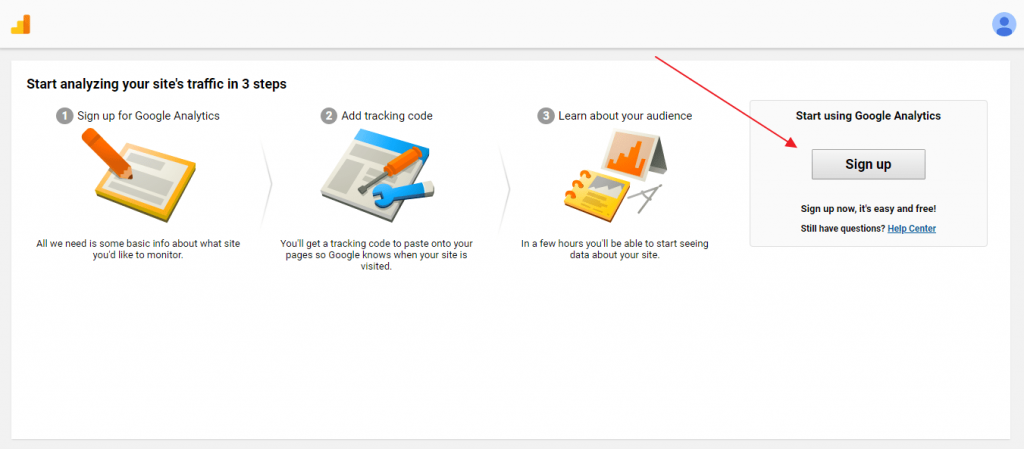
Start by going to Google Analytics.
Make sure you are logged into your Gmail account or else Google Analytics won’t let you proceed.
Once you are in, Google analytics is going to ask you to sign up for their program… Go ahead and do it.
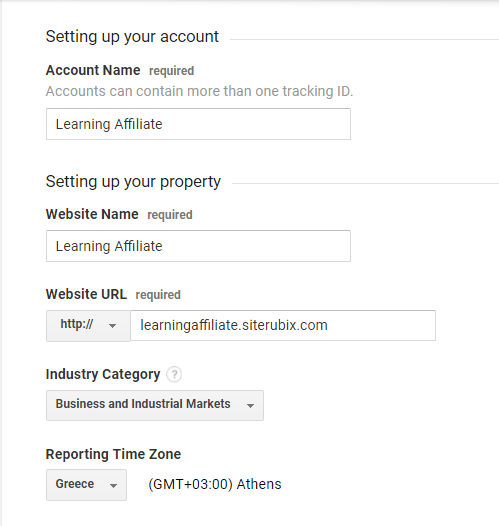
Fill in your
- Account name (I used my website name there)
- Your website name
- Your URL
- most relevant industry category
- Reporting Time Zone
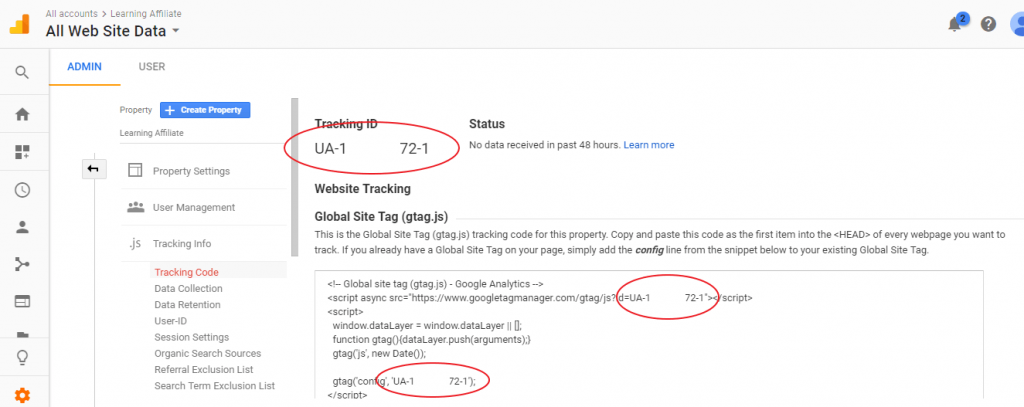
After you filled in everything, hit “Get Tracking ID” at the bottom of the page.
Copy your tracking ID, formatted as UA-########-#, and go back to your WordPress admin dashboard, “All in One SEO” -> “General Settings” -> “Google Settings”, and paste it in the “Google Analytics ID field”.
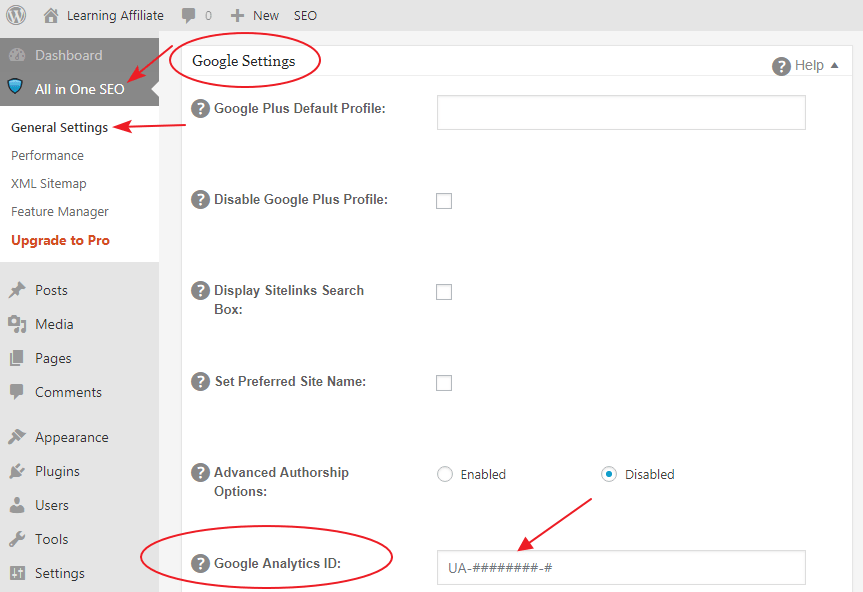
Once you have pasted the code, scroll all the way down and save your changes once more.

We are all done with Google Analytics as well 🙂
Over to You
Your WordPress website set up is complete.
As you move forward it is possible that you will have to keep optimizing, adding other plugins, changing settings, etc but for now you don’t have to worry about any of this.
The only thing that you need to focus on right now is creating your initial website content, the first few posts, and pages which are going to be the foundation of your website and your success.
If you have any questions or need any further help or guidance from me, I encourage you to leave a comment below or email me at harry@dearboss-iquit.com.
You could also send me a PM at my Wealthy Affiliate Profile.
Whatever the case, I will get back to you as soon as possible.
My best regards to you,
Harry!


